# Introduction to XPR Network Explorer
An easy step-by-step guide on how to access and maximize the full potential of the XPR Network Block Explorer - explorer.xprnetwork.org
Visit the appropriate Block Explorer below:
**XPR Network**
* [XPR Network Mainnet](https://explorer.xprnetwork.org/)
* [XPR Network Testnet](https://testnet.explorer.xprnetwork.org/)
**Other Blockchains**
* [FIO Mainnet Explorer](https://fio.bloks.io/)
* [FIO Testnet Explorer](https://fio-test.bloks.io/)
* [WAX Mainnet Explorer](https://wax.bloks.io/)
* [WAX Testnet Explorer](https://wax-test.bloks.io/)
**Developer Focused**
* [Local (Custom Endpoint)](https://local.bloks.io/)
For any support, questions, or comments, contact us via Telegram at or our Help Desk at [https://help.xprnetwork.org](https://help.xprnetwork.org/)
# Mobile Wallets
Mobile wallets allow you to access your XPR Network accounts on your phone. Some of these wallets are integrated on [explorer.xprnetwork.org](https://explorer.xprnetwork.org/) to allow you to login using these wallets.
Mobile wallets that are currently compatible with the explorer are;
#### XPR Network
* [WebAuth Wallet on iOS](https://apps.apple.com/us/app/webauth/id1594500069)
* [WebAuth Wallet on Android](https://protonloan.gitbook.io/proton)
* [WebAuth.com Wallet for Browsers](https://webauth.com/)
* [Anchor](https://www.greymass.com/anchor)
* [Ledger](https://www.ledger.com/supported-crypto-assets)
#### FIO Blockchain
* [Anchor](https://www.greymass.com/anchor)
#### WAX Blockchain
* [Cloud Wallet](https://www.mycloudwallet.com/)
* [Scatter](https://www.get-scatter.org/)
* [Anchor](https://www.greymass.com/anchor)
# WebAuth
The Official XPR Network wallet by [Metallicus](https://metallicus.com/) allows you to send, receive and stake the native network token XPR as well as a huge range of Metallicus wrapped xTokens and other digital assets.
### LOGIN TO XPR NETWORK EXPLORER USING WEBAUTH
#### 1. Install WebAuth application [here](https://xprnetwork.org/wallet)
#### 2. Go to XPR network explorer. Click Login at the top right corner.
#### 3. Select WebAuth in the Connect To Wallet pop up window.
####
#### 4. WebAuth will show you popup to select the type of authentication. Select the appropriate one.
####
#### 5. Let's try with Mobile. It will show the QR code to scan using the mobile application.
#### 6. Confirm that you are successfully logged in.
You should see your account username in the top right corner if you have successfully logged in.
# Anchor
Anchor is a security and privacy focused open-source digital wallet for all Antelope-based networks including XPR Network, FIO and WAX blockchains.
This wallet is useful if you are an advanced user or developer and want to login to the explorer using your (owner) key permission.
## LOGIN TO [EXPLORER](https://explorer.xprnetwork.org/) USING ANCHOR
### 1. Download and install Anchor [here](https://www.greymass.com/anchor).
Make sure the app stays active and the window is open while you interact with the [explorer](https://explorer.xprnetwork.org/).
### 2. Go to Explorer, Click Login at the top right corner.
### 3. Select Anchor in the Connect To Wallet pop up window.
### 4. Anchor will show you QR code to scan with mobile application.
### 5. Confirm that you are successfully logged in.

You should see your account username in the top right corner if you have successfully logged in.
# Lynx
Lynx mobile is available on both the App Store and the Google Play store.
{% embed url="" %}
## LOGIN TO BLOKS.IO USING LYNX (iOS)
{% hint style="info" %}
Lynx Wallet on iOS does not feature the Explore tab therefore you are unable to login to Bloks.io using Lynx Explorer tab on iOS. Please follow the directions below to login to Lynx using iOS.
{% endhint %}
### 1. Download and install Lynx Wallet on the App Store.

Lynx Wallet is available for download on iOS, Android, and Desktop.
### 2. Start the app on your mobile. Go to the main page, and click "..." on the top right corner.

### 3. From the options listed, select "View on Bloks.io".

### 4. You will be able to view your current account on Bloks.io. Click "Login" in the top right corner.

### 5. A "Connect To Wallet" window will pop up. Select Lynx.

### 6. Confirm that you are successfully logged in.

You should see your account username in the top right corner if you have successfully logged in.
## LOGIN TO BLOKS.IO USING LYNX (Android)
### 1. Download and install Lynx Wallet.

Lynx Wallet is available for download on iOS, Android, and Desktop.
### 2. Start the app on your mobile. Go to the main page, and click "Explore".

### 3. Go to Utilities and find Bloks.io underneath.

### 4. Confirm that you are successfully logged in.

You should see your account username in the top right corner if you have successfully logged in.[ ](https://app.gitbook.com/@eos-cafe-block/s/bloks/~/drafts/-Ln_9pDSa4pUka2peWf5/primary/login/mobile-wallets)[ ](https://app.gitbook.com/@eos-cafe-block/s/bloks/~/drafts/-Ln_9pDSa4pUka2peWf5/primary/login/mobile-wallets)
# MEET.ONE
MEET.ONE wallet is created by the MEET.ONE team who operate as a block producer on EOSIO mainnet. Their wallet supports;
* EOS
* MEET.ONE
* Binance
* Cosmos
* Ethereum
{% hint style="info" %}
**FOR IOS USERS** - Please be aware that there are two versions of MEET.ONE wallet available - MEET.ONE and MEET.ONE Pro. To login to Bloks.io on iOS, **you must download MEET.ONE Pro** and use it through TestFlight. Click [here](https://testflight.apple.com/join/7OZIWDxC) to find the download link for MEET.ONE Pro for iOS.
{% endhint %}
{% embed url="" %}
## LOGIN TO BLOKS.IO USING MEET.ONE
### 1. Download and install MEET.ONE.

MEET.ONE is available for download on iOS, and Android,
### 2. Start the app on your mobile. Go to the main page, and click "Discovery".

### 3. You can either type in Bloks at the top search bar or scroll down to Third-party Tools to find Bloks.io.


### 4. MEET.ONE will prompt you with a message that you are being redirected to Bloks. Click OK.

### 5. Confirm that you are successfully logged in.

You should see your account username in the top right corner if you have successfully logged in.[ ](https://app.gitbook.com/@eos-cafe-block/s/bloks/~/drafts/-Ln_9pDSa4pUka2peWf5/primary/login/mobile-wallets)
# NOVA Wallet
NOVA Wallet is a mobile multichain wallet that allows easy and fast token transfers, has enhanced security, and supports staking through the wallet.
{% embed url="" %}
## LOGIN TO BLOKS.IO USING NOVA WALLET
### 1. Download and install NOVA Wallet.

NOVA Wallet is available for download on both the App Store and Google play store.
### 2. Start the app on your mobile. Go to the main page, and click "More".

### 3. Click "Discovery" under "More".

### 4. Scroll down to "Tool" section and click on Bloks.

### 5. NOVA Wallet will prompt you to select the account you would like to use to interact with Bloks.io.

Select the account you would like to use on Bloks and click Add.
### 5. Confirm that you are successfully logged in.

You should see your account username in the top right corner if you have successfully logged in.
# TokenPocket
TokenPocket is a universal digital wallet, and supports many blockchains including;
* EOS
* Ethereum
* IOST
* Tron
* BINANCE
* BOS
* COSMOS
* MOAC
* Jingtum
* ENU

{% hint style="info" %}
**FOR IOS USERS** - Please be aware that there are two versions of TokenPocket available - TokenPocket and TokenPocket Pro. To login to Bloks.io on iOS, **you must download TokenPocket Pro** and use it through TestFlight. Click [here](https://download.tokenpocket.pro/index.html#/?platform=ios) to find the download link for TokenPocket and TokenPocket Pro for iOS. You can also read more about it [here on TokenPocket's medium post](https://medium.com/@tokenpocket.gm/tokenpocket-pro-is-live-with-a-built-in-dapp-store-f32431f64ed9).
{% endhint %}
{% embed url="" %}
## LOGIN TO BLOKS.IO USING TOKENPOCKET
### 1. Download and install TokenPocket.

TokenPocket is available for download on iOS, Android, and Desktop.
### 2. Start the app on your mobile. Go to the main page, and click "Discover".

### 3. You can either type in Bloks at the top search bar or scroll down to Block Explorer to find Bloks.io.


### 4. TokenPocket will prompt you with a message that you are being redirected to Bloks. Click Understood.

### 5. Confirm that you are successfully logged in.

You should see your account username in the top right corner if you have successfully logged in.[ ](https://app.gitbook.com/@eos-cafe-block/s/bloks/~/drafts/-Ln_9pDSa4pUka2peWf5/primary/login/mobile-wallets)
# Desktop Wallets
Desktop wallets are wallets that you can access through your computer. Desktop wallets that are currently compatible with Bloks.io are;
* [Anchor](https://docs.bloks.io/login/desktop-wallets/anchor)
* [Cleos/eosc](https://docs.bloks.io/login/desktop-wallets/cleos-eosc)
* [Keycat](https://docs.bloks.io/login/desktop-wallets/keycat)
* [Ledger](https://docs.bloks.io/login/desktop-wallets/ledger)
* [Lynx](https://docs.bloks.io/login/desktop-wallets/lynx)
* [Math/Leaf](https://docs.bloks.io/login/desktop-wallets/math-leaf)
* [Scatter](https://docs.bloks.io/login/desktop-wallets/scatter)
* [SimplEOS](https://docs.bloks.io/login/desktop-wallets/simpleos)
* [TokenPocket](https://docs.bloks.io/login/desktop-wallets/TokenPocket)
* [Trezor](https://docs.bloks.io/login/desktop-wallets/trezor)
# cleos/eosc
Cleos and eosc are both command line tools used to interact with Antelope blockchain networks including [XPR Network](https://xprnetwork.org/).
You will need to visit [Antelope Leap](https://github.com/AntelopeIO/leap/releases) download and install **Leap v5.0.3** which contains and will install **keosd** and **cleos** as well.
## LOGIN TO EXPLORER USING CLEOS
### 1. Download and install the [Leap](https://github.com/AntelopeIO/leap/releases).
```
sudo apt-get update
sudo apt-get install -y ~/Downloads/leap*.deb
```
### 2. Go to [Explorer](https://explorer.xprnetwork.org/). Click Login at the top right corner.
### 3. Select cleos in the Connect To Wallet pop up window.
### 4. Enter your account name
### 5. Confirm that you are successfully logged in.
You should see your account username in the top right corner if you have successfully logged in.
### 6. Do a transaction - copy and paste the cleos command.
# Ledger
This quick guide will walk you through how to use your XPR account with a [Ledger Nano X ](https://shop.ledger.com/products/ledger-nano-x)or [Ledger Nano S.](https://shop.ledger.com/products/ledger-nano-s/) This allows you to use the [XPR Network Explorer](https://explorer.xprnetwork.org/), the most comprehensive EOSIO Portal, with the added security of a hardware wallet from the convenience of your browser.
{% embed url="" %}
## LOGIN TO [EXPLORER](https://explorer.xprnetwork.org/) USING LEDGER S/X
### 1. Prepare Ledger S/X.
Before you get started, make sure you have completed the following setup:
* Ledger is configured and powered **on**
* Ledger is firmware is updated and has the **EOS App** installed
If you haven’t completed these steps, [click here](https://support.ledger.com/hc/en-us/articles/360000613793-Set-up-as-new-device) before following along with this guide.
### 2. Go to [Explorer](https://explorer.xprnetwork.org/). Click Login at the top right corner.

Head to [Explorer](https://explorer.xprnetwork.org/) and click on the Login Button on the top right-hand side of the page.
### 3. Log into Explorer with your Nano Ledger S/X. Select Ledger X or Ledger S as a sign-in option.

Find **Ledger X or Ledger S** as a sign-in option and select it.

Enter **“0,1,2"**, and select either USB or Bluetooth.

If this is the first time using your Ledger, you will see a message similar to the image above stating there are “**No Accounts Found**”. This is to be expected. **Copy** one of the **public keys** displayed onto a notepad.
If you don’t have an XPR Network account, create one [here](https://explorer.xprnetwork.org/wallet/create-account/advanced) with the key you copied, and proceed to **Step 4**.
If you already have an XPR Network account on another wallet such as Scatter, proceed to **Step 3**.
### 4. Log into your existing account.

Head over to the [Permission Manager.](https://explorer.xprnetwork.org/wallet/permissions) Log into your existing EOS account using Scatter or another wallet. Make sure you log in with your **Owner Key**(can change both Owner and Active) or **Active Key** (can only change Active).
Paste your keys from Step 2 into the fields above and click **Change Permissions**. Take care to ensure the keys you paste are the same you copied in Step 2.
### 5. Login to [Explorer](https://explorer.xprnetwork.org/) with your Ledger S/X and it will show you your account.

Repeat all the steps in Step 2. This time the [Explorer](https://explorer.xprnetwork.org/) should show you the accounts associated with your Ledger key.
### 5. Allow Contract Data. *(Optional)*
If you want to be able to interact with custom contracts on the XPR Network blockchain, you will need to turn on *Contract Data* on your ledger device. To do this complete the following steps:
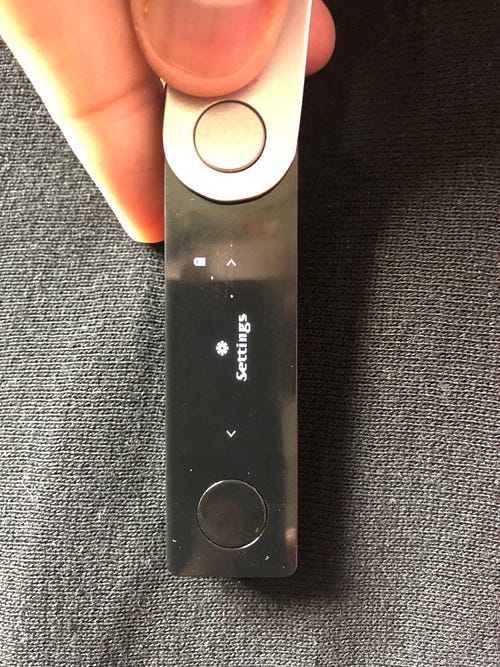
* Open the EOS app on your Nano Ledger
* Scroll through and select **Settings**
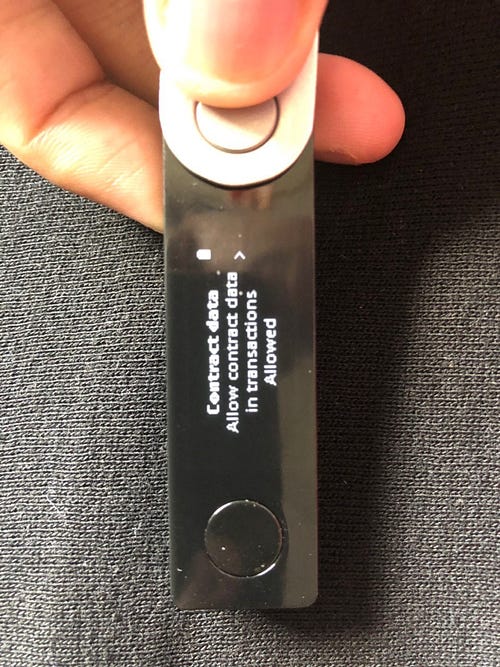
* Find the “**Contract Data**” setting (the default setting should be **NOT Allowed).**
* Use the buttons to change this setting to **Allowed.** You can now use your Ledger to complete custom contract action on EOS.
# Lynx
Lynx is a non-custodial wallet and supports multiple chains such as EOS, Telos, BOS blockchain with more to come. It is offered in both desktop and mobile versions, providing a smooth user experience on multiple platforms.
{% embed url="" %}
## LOGIN TO BLOKS.IO USING LYNX
### 1. Download and install Lynx [here](https://lynxwallet.io/downloads).


### 2. On the Lynx Desktop app, go to the "Apps" tab.

### 3. Scroll down to find "Bloks.io" under "Utilities".

Click on "Bloks.io" under "Utilities" to interact with Bloks.io directly from Lynx's desktop wallet.
### 4. Confirm that you are successfully logged in.

You are successfully interacting with Bloks.io Lynx desktop wallet.
# Math/Leaf
Math Wallet supports a number of high performing public chains including but not limited to;
* Bitcoin
* Ethereum
* EOS
* TRON
* BOS
* Telos
* WORBLI
{% embed url="" %}
Leaf Wallet is an easy to use EOS wallet that works as a chrome or internet explorer extension.
{% embed url="" %}
## LOGIN TO BLOKS.IO USING MATH
### 1. Download and install the Math Google Chrome extension [here](https://chrome.google.com/webstore/detail/math-wallet/afbcbjpbpfadlkmhmclhkeeodmamcflc). Setup Math Wallet.

Visit Math Wallet's website/chrome web store to Add to Chrome.

Add Math Wallet extension to your chrome.

Setup Math Wallet via chrome extension.
### 2. Go to Bloks.io. Click Login at the top right corner.

### 3. Select Math/Leaf in the Connect To Wallet pop up window.

### 4. Math Wallet will prompt you to select the account to be used on Bloks.io.

Press Accept to continue logging in to Bloks.io using Math Wallet.
### 5. Confirm that you are successfully logged in.

You should see your account username in the top right corner if you have successfully logged in.
## LOGIN TO BLOKS.IO USING LEAF WALLET
### 1. Download and install Leaf Wallet [here](https://chrome.google.com/webstore/detail/leafwallet-easy-to-use-eo/cihmoadaighcejopammfbmddcmdekcje?hl=en).


### 2. Go to Bloks.io. Click Login at the top right corner.

### 3. Select Math/Leaf in the Connect To Wallet pop up window.

### 4. Confirm that you are successfully logged in.

You should see your account username in the top right corner if you have successfully logged in.
# Scatter
Scatter is a widely used wallet for your digital currency and assets. Scatter currently supports;
* EOS
* Ethereum
* Tron
* Telos
* Worbli
* EOSforce
Scatter is fast, powerful and functional and is partnered with various wallets who use Scatter-js.
{% embed url="" %}
## LOGIN TO BLOKS.IO USING SCATTER
### 1. Download and install Scatter [here](https://get-scatter.com/download).

Scatter is available for download on MacOS, Windows, or Linux.
### 2. Go to Bloks.io. Click Login at the top right corner.

Make sure the Scatter is open during your login.
### 3. Select Scatter in the Connect To Wallet pop up window.

### 4. Scatter will prompt you to confirm that Bloks is relinking to Scatter.

Click Allow - this will allow Scatter to interact with Bloks.
### 5. Confirm that you are successfully logged in.

You should see your account username in the top right corner if you have successfully logged in.
# Download & Install
## DOWNLOAD & INSTALL SCATTER (MAC)
### 1. Visit the Scatter website to download Scatter for your operating system.

Scatter is available for download on MacOS, Windows, or Linux.
### 2. Install Scatter on your Mac by dragging the icon into Applications.

### 3. Open Scatter.

If you get a pop up warning, confirm the download location and press open.
### 4. Start up Scatter.

There are 2 options for you to connect with Scatter;
* **I'm new to blockchain** - Scatter will set you up with a new blockchain account if you don't have any current accounts.
* **I have my own private keys** - If you already have a blockchain account, you can connect to Scatter using your keys by entering them manually.
## SETUP SCATTER - NEW TO BLOCKCHAIN

### 1. Review the Acceptance of Terms.

Click Accept Terms if you have reviewed and agree with the Terms.
### 2. Set a password.

Create a strong password - good tips for a strong password are;
* Minimum of 12 characters
* Includes numbers (1234567890)
* Includes symbols (!@#$%^&\*)
* Use both upper and lower cases (EoS)

Press next once you've set your password.
### 3. Continue by clicking on Start using Scatter.

### 4. Since there are no accounts associated with the account, you will need to Generate Key or Import Key.

For the sake of this tutorial, we will select Generate Key.
### 5. Select the blockchain you'd like to generate keypair for - EOSIO in this case.

### 6. Export your Private Key.

You can export your private key as text or as a paper wallet (an encrypted QR code). Copy and paste your keypair if you've exported it as text. Save QR as Image in a safe location if you have exported your keypair as an encrypted QR code.


### 7. Go back to the Main Page of Scatter. You can now create an account linked to the keypair you created.

### 8. Create an account by sending funds from an exchange or another wallet.

### 9. Select an Account Name.


Scatter will indicate whether the account name is taken or not. Keep in mind that the account name must be 12 characters, all lower case and can include numbers from 1-5.
### 10. Copy the memo and send EOS to makeaccounts to create the account. Click the button on the right hand bottom corner after you've transferred the amount.

To create the account, you must send EOS to makeaccounts with the proper memo, otherwise your funds will be lost.
### 12. You will receive a prompt saying Scatter has found the account. Click "Okay".

### 13. Confirm that your account has been created and linked to the key pair you created on Scatter.

Your new account name should be listed under the EOSIO Key you have created.
## SETUP SCATTER - ALREADY HAVE AN ACCOUNT

### 1. Review the Acceptance of Terms.

Click Accept Terms if you have reviewed and agree with the Terms.
### 2. Set a password.

Create a strong password - good tips for a strong password are;
* Minimum of 12 characters
* Includes numbers (1234567890)
* Includes symbols (!@#$%^&\*)
* Use both upper and lower cases (EoS)

Press next once you've set your password.
### 3. Import Keypair.

There are 3 options to import your keypair;
* Text - Manually type in your private key
* Hardware - Connect your hardware (Scatter supports Ledger Nano S or Scatter/LiquidEOS DIY Hardware Wallet)
* QR Code - Scan your QR Code
Once you input your keypair using one of the methods, it will automatically load the next screen.
### 4. Continue by clicking on "Start using Scatter".

### 4. Confirm that your account is setup on Scatter.

Your account name and your public key should be displayed on the Wallet page of Scatter.
# SimplEOS
SimplEOS is a wallet created by the highly technical team at EOSRIO. It is a wallet created solely for the EOS ecosystem and fully integrated with all features available in the EOS.IO software.
{% embed url="" %}
## LOGIN TO BLOKS.IO USING SIMPLEOS
### 1. Download and install SimplEOS [here](https://eosrio.io/simpleos/).


SimplEOS is available for download on MacOS, Windows, or Linux.
### 2. Go to Bloks.io. Click Login at the top right corner.

### 3. Select SimplEOS in the Connect To Wallet pop up window.

### 4. SimplEOS will prompt you to confirm that Bloks is relinking to SimplEOS.

Choose the account you want to connect - this will allow SimplEOS to interact with Bloks.
### 5. Confirm that you are successfully logged in.

You should see your account username in the top right corner if you have successfully logged in.
# Trezor
Trezor is a hardware wallet to store your crypto offline rather than online. Currently they support;
* Bitcoin
* Litecoin
* Bitcoin Cash
* Bitcoin Gold
* Dash
* Zcash
* NEM
* Ethereum
* Ethereum Classic
{% embed url="" %}
## LOGIN TO BLOKS.IO USING TREZOR
### **1. Go to Wallet on the top menu.**

### **2. Click login and then click Trezor.**

### **3. Click connect (modify key index if needed).**

### **4. Allow on Trezor Connect.**


### **5. Allow on Trezor Device.**

If you already have an account linked to your Trezor, skip to step 7.
### **6. Create EOS account.**


### **7. Login to EOS Account**
If you just created a new account, repeat steps 1–5.
Bloks.io will show a list of selectable accounts linked to your Trezor key.

Once you click the account, you will see that you are logged in to Bloks with a powerful web wallet interface and explorer at your fingertips.

### **8. Execute any TX**
This guide will show an EOS transfer example

Executing a transaction will bring up a Trezor Connect window

Next, you will see confirmation dialogs on your Trezor device:

Finally, you will see a transaction success message:

Click on the Transaction ID to see details

### **9. View account info.**
To view information about your EOS account, you can search your account name in the search bar. This will bring up your account with all tokens, resources and actions.

# Transfer
XPR Network's DPOS consensus mechanism allows free (no gas fees), quick and easy transfers between accounts. The XPR Network Explorer's [wallet](https://explorer.xprnetwork.org/wallet/transfer) functions allow users to transfer tokens in 3 easy steps.
## HOW TO TRANSFER
### 1. Select **Wallet** on the top menu.
### 2. Transfer Tokens page should be the initial page under Wallet. (If for whatever reason it is not, select **Transfer Tokens** from the left side menu.)
The Transfer Tokens page has 3 fields for you to fill in;
* **Send To** - Username to receive tokens.
* **Amount** - Amount of tokens to send to the receiver. Clicking on the blue button on the right will display a drop down list of all the tokens you own on the account.
* Selecting **Use custom token** will allow you to manually enter the **Symbol of token** (e.g. XPR) and **Contract of token** (e.g. eosio.token)
* You can select **Send entire balance** to autofill the amount.
* **Memo (optional)** - You can send a memo with your transfer.
### 3. Click on the "Transfer *AMOUNT* to *USERNAME"* blue button to complete transfer.
# Multi transfer
## HOW TO TRANSFER MULTIPLE TOKENS
### 1. Go to Wallet → Transfer tokens page
### 2. Switch to Multi transfer tab in top menu of the page
This page has 2 fields for you to fill in;
* **Send To** - Username to receive tokens.
* **Memo (optional)** - You can send a memo with your transfer.
### 3. Select tokens you want to transfer and put the amount in front of each selected token.
### 4. Click Transfer button
# Batch transfer
## HOW TO TRANSFER TOKENS TO MULTIPLE ACCOUNTS
### Go to Wallet → Transfer tokens page
### Switch to Batch transfer tab in top menu of the page
### Prepare CSV file using the example on the page and upload it
The template for CSV is the following: `to, amount, token, contract, memo`
### Check the results table
### Click Transfer button
# Transfer NFTs
### Go to Wallet → Transfer tokens page
### Switch to Transfer NFTs tab in top menu of the page
This page has 2 fields for you to fill in;
* **Send To** - Username to receive NFTs.
### Select NFT to transfer an click Transfer button
# Batch Transfer NFTs
### Go to Wallet → Transfer tokens page
### Switch to Batch Transfer NFTs tab in top menu of the page
### Prepare CSV file using the example on the page and upload it
The template for CSV is the following: `to, assetId, memo`
### Check the results table and click Transfer button
# Staking + Unstaking
Staking on XPR Network allows token holders to actively participate in network governance and support the security and decentralization of the blockchain through **Delegated Proof of Stake (DPoS)**.
When you stake your XPR, you’re helping shape the future of the network by voting for **Block Producers,** the entities responsible for validating transactions and maintaining the network. Stakers are required to vote for **at least 4 Block Producers**. While voting is mandatory for staking, the specific Block Producers you select **do not impact the amount of staking rewards you receive**. View the full list of active [Block Producers here](https://explorer.xprnetwork.org/).
Staking rewards are distributed automatically and proportionally based on the amount of XPR you have staked. Voting is about governance, not reward optimization - it’s your opportunity to influence who runs the network and how it evolves.
Governance and voting take place at [**gov.xprnetwork.org**](https://gov.xprnetwork.org), where you can view active Governance Proposals, cast your votes, and stay informed about important network changes.
{% hint style="warning" %}
The process of unstaking your XPR takes a **total of 24 hours** from the moment you click unstake to when you will have full access to move the XPR. This is a security feature to add a one-day buffer incase your keys may be compromised. Staking your XPR can add this layer of security for your account. If a hacker gets hold of your wallet or active key and tries to unstake your XPR, users can use their owner permission key to overwrite and change the active permission key before the 24-hour unstaking period if complete.
{% endhint %}
## HOW TO STAKE XPR
### 1. Select **Wallet** on the top menu.
### 2. Select **Short Stake XPR** from the left side menu.
The Short Stake XPR page should show four tabs;
* **Stake** - Use this page to stake XPR
* **Unstake** - Use this page to unstake XPR
* **Claim Rewards** - Claim your XPR Short Staking rewards once every 24 hours.
* **Refund** - Refund is when it has been 3 days or more since you have unstaked and the action has gotten stuck.
**Note:** You must be logged into the [explorer](https://explorer.xprnetwork.org/wallet/staking/stake) before you can Stake XPR
### 4. Enter in the **Amount of XPR to Stake**
To make the process more simple, there are buttons to select a percentage of your XPR holdings - 25, 50, 75 and 100%.
### 5. Click the blue button Stake to confirm the amount of XPR you are staking and sign the transaction
You can use the [WebAuth.com](https://webauth.com/) Wallet signing window to view the smart contract, actions and parameters on before confirming the transaction. When you are ready, click Sign.
## HOW TO UNSTAKE XPR
### 1. Select **Wallet** on the top menu.
### 2. Select **Short Stake XPR** from the left side menu.
### 3. Select the Unstake tab.
Enter the amount of XPR you wish to unstake.
**Note:** It takes 24 hours to unstake your XPR before you can use it again.
### 4. Press the blue button Unstake to complete transaction.
Click Unstake and Sign the transaction with your [WebAuth.com](https://webauth.com/) Wallet (or compatible wallet)
## REFUND
If you followed the above instructions to unstake XPR, you should receive the amount in **24 hours**. You can check how much you will be receiving and how much time is left on the Refund tab in [Short Stake XPR](https://explorer.xprnetwork.org/wallet/staking/refund). If for whatever reason, you did not receive the refund amount back, check back on this page and click the blue Refund button to manually process the refund.
# Buy / Sell RAM
RAM stands for Random Access Memory; it is a form of computer data storage that stores data and code currently being used. XPRNetwork RAM is a resource required for dApp developers for their smart contracts to be deployed.
## HOW TO BUY RAM
### 1. Select **Wallet** on the top menu.

### 2. Select Buy/Sell RAM from the left side menu.

The Buy/Sell RAM page has 2 tabs available;
* **Buy RAM**
* **RAM Receiver** - Enter in the username of RAM receiver (ex. easyaccount1)
* **Buy in EOS or Bytes?** - Select metrics for purchasing RAM
* **Amount of RAM to Buy in EOS** - The field below will auto-calculate and show you the equivalent in Bytes (ex. 1 EOS ≈ 11,304 Bytes as of August 9th, 2019)
* **Sell RAM**
* **Bought** - Displays how much RAM you've purchased in Bytes/EOS
* **In Use** - Displays how much RAM is in use in Bytes/EOS
* **Available** - Displays how much RAM is available in Bytes/EOS
* **Amount of RAM to Sell (Bytes)** - You can manually enter how much to sell, or select one of the four buttons below to auto-calculate how much RAM to sell in percentages
### **3.** Select the Buy RAM tab and fill out RAM Receiver and the Amount of RAM to Buy (Bytes OR EOS). Click the blue Buy RAM button to finalize action.

## HOW TO SELL RAM
### 1. Select **Wallet** on the top menu.

### 2. Select Buy/Sell RAM from the left side menu.

### 3. Select the Sell RAM tab and fill out the Amount of RAM to Sell (Bytes). Click the blue Sell RAM button to finalize action.

You can enter a value manually or select one of the buttons below the field to auto-calculate 25, 50, 75 or 100% of the available RAM on your account.
# Create Account
To interact with the blockchain and use dApps on XPR Network, you will need to have an XPR Network account. The account will store your data on the blockchain such as your account name, transfers, and how many tokens you own.
For regular users, you can get a free account from [WebAuth.com](https://webauth.com/) which includes resources such as RAM by default.
A new XPR Network account can also **be created by someone with an existing account** [**here on the Explorer**](https://explorer.xprnetwork.org/wallet/create-account/advanced). You will need to buy a minimum of 3000 bytes of RAM for this account to get started.
{% hint style="info" %}
If you don't currently have an XPR Network account you can get your free account (including free RAM) using [WebAuth.com](https://webauth.com/)
{% endhint %}
## HOW TO CREATE AN XPR ACCOUNT
### 1. Select **Wallet** on the top menu.
### 2. Select Create Account from the left side menu.
The Create Account page has 2 tabs;
* **Advanced** - Allows you to create a new XPR Network account manually.
* **New Account to create** - Username of the new account. Needs to be between 4-12 characters, lowercase, and only characters a-z and 1-5 can be used in the name.
* **New Accounts Public Owner Key** - Public key only, should be 57 characters long and start with PUB\_K1\_ (This key will be your owner permission, this has elevated permissions above the Active Key)
* **New Accounts Public Active Key** - Public key only, should be 57 characters long and start with PUB\_K1\_ (This key will be your active permission, this ***can*** be the same as Owner)
* **RAM to buy for New Account (in Bytes) -** Minimum for new account is 3000. Change as required.
* Link Email
* Allows you to link an email address to your manually created XPR Network account so that you can complete the on-chain [identity verification](https://identity.metallicus.com/).
# Change Keys or Permissions
**If you wish to change your owner or active key:**
{% content-ref url="/pages/-LkQ26yIxpzmLPYjz20p" %}
[Change Active / Owner Key](/wallet/permissions/change-active-owner-key)
{% endcontent-ref %}
**If you are looking for an advanced permissions manager:**
{% content-ref url="/pages/-LkQ2AIIBcH52QmuJM6T" %}
[Add Custom Permission](/wallet/permissions/add-custom-permission)
{% endcontent-ref %}
**If you are looking for limit the actions a permission can perform:**
{% content-ref url="/pages/-LkQ2Dst9HhvlHC5ReDO" %}
[Link Auth](/wallet/permissions/linkauth)
{% endcontent-ref %}
# Change Active / Owner Key
An EOS account can have multiple keys associate with it. Each key allows a certain permission to the account it is attached to.
It is a recommended safety measure to create both an **Active** and **Owner Key** for your EOS account in the case that your Active Key becomes compromised as actions can be taken via your Owner Key to limit access to the hacker.
An **Owner Key** allows you Owner permission to your EOS account. As the name dictates, having the Owner Key means you have ownership of the account. There are very few transactions that require you to use your Owner Key and you should not be using it on a regular basis for daily transactions.
An **Active Key** allows you to set restricted permissions and can be used for transferring funds, voting, and making other account related changes.
{% hint style="warning" %}
It is important for you to always keep your keys safe. Exposing your Owner Key may lead your account being compromised. Never share your Owner Key with anyone.
{% endhint %}
## HOW TO CHANGE ACTIVE/OWNER KEY
### 1. Select **Wallet** on the top menu.

### 2. Select Keys and Permissions from the left side menu.

The Keys and Permissions page displays 3 tabs;
* **Simple** - Displays what permission you are currently logged in with, what keys you are able to change, and a field to enter New Active Key
* **Advanced** - Allows you to Add New Permissions
* **Link Auth** - Shows fields for Permission (only needed for linking), Contract Name, Contract Action
If you are logged in with your Owner Key, you should see two fields; New Owner Key and New Active Key.


### 3. Enter your New Active/Owner Key in the respective field. Click Change Permissions.
You can generate new keys by using various methods. The most secure method is to generate a key pairing while you are offline using EOSKEY.io and storing the private key offline where it is safe.

Confirm that the New Active Key displays under the New Permissions tab identically. Click the Change Permissions button and confirm that the key has been changed when you receive a transaction hash with a Success message.

## Potential Errors
{% hint style="danger" %}
### Scatter users may receive an error "firewalled". This is because Scatter automatically Blacklists updateauth as an action.
You will need to open up Scatter, go to Settings, Firewall, and remove updateauth as a Blacklisted Action.
{% endhint %}


# Add Custom Permission
You can create custom permissions to allow only certain functions to happen.
## HOW TO MAKE A CUSTOM PERMISSION
### 1. Select **Wallet** on the top menu.

### 2. Select Keys and Permissions from the left side menu.

Click on the Advanced tab.
It will display two permissions, #1 Owner and #2 Active.
### 3. Click Add New Permission. Enter required fields and click Save Permission.


Click Add New Permission, which will create Permission #3 where you are able to set the Permission Name, Parent, Threshold, Add Key , Add Account and Add Wait.
You will need to create a new key pair for the new permission. For instructions on how to do so, check out the Web Key Generator page below.
{% content-ref url="/pages/-LkQ2h5veWUUlnQ0g5zG" %}
[Keys Generator](/wallet/key-generator)
{% endcontent-ref %}
Once you've filled in all the fields required, press Save Permission.
### 4. When prompted by Scatter, review the action and click allow when you are certain it is correct.


When updateauth is approved, you will receive a Success message with a transaction hash. Your new permission has been created. Follow the next guide Linkauth to learn how to link an authorization to the new permission you've just created!
{% content-ref url="/pages/-LkQ2Dst9HhvlHC5ReDO" %}
[Link Auth](/wallet/permissions/linkauth)
{% endcontent-ref %}
# Link Auth
Now that a new custom permission has been created (previous guide), you need to assign to the permission what it is allowed to do using Link Auth.
## HOW TO MAKE A LINK AUTH
### 1. Select **Wallet** on the top menu.

### 2. Select Keys and Permissions from the left side menu.

Click on the Link Auth tab.
It will show;
* Permission (only needed for linking) - This is the name of the permission you created from Add Custom Permission (eg. In our case it was vote).
* Contract Name - Name of the contract (eg. eosio)
* Contract Action - Name of the action (eg. claimrewards)
{% hint style="info" %}
You can find a complete list of eosio contract actions at [EOSIO on Bloks.io, Contract, and Actions. ](https://bloks.io/account/eosio?loadContract=true\&tab=Actions\&account=eosio\&scope=eosio\&limit=100)
{% endhint %}
### 3. Fill in the 3 required blank fields and click Link Auth.

Once all three required fields are filled out, check the bottom to see if the correct permission you want to link authorization to is highlighted with the contract name and contract action you've input. Click Link Auth to finalize transaction.

If you are using Scatter, you will need to click Allow action linkauth to proceed with this action.

A success message will pop up with a transaction has to confirm you've completed Link Auth.
# Multi-signature (MSIG)
## HOW TO CREATE AN MSIG
### 1. Check that you are logged in to the [XPR Network Explorer](https://explorer.xprnetwork.org/) using one of the wallet options.
### 2. Select the dropdown menu from your account and toggle the Multisig Mode option to the on position as pictured.
### 3. Select **Wallet** on the top menu.
### 4. Transfer Token page should be the initial page under Wallet. We will demo a transfer transaction for this MSIG.
Fill out the 3 fields and click the Transfer button to complete transaction.
### 5. You will be taken to a new page to Propose Multisig Transaction.
The Multisig page will have 4 fields to fill in;
* Proposer - The account you are proposing the multisig from.
* Proposal Name - Name of the proposal and can be 2-12 characters long.
* Requested Approvals - List which accounts can prove this transaction. These are accounts listed as authorizations. This field is required to do a proposal.
* Actor - Account name
* Permission - Owner or Active
* Authorization
* Actor
* Permission
Depending on the permissions setup on the account you are initiating the multisig transfer from, the Requested Approvals should automatically be filled out. If not, enter the from account in the Authorization field and check again.
You can also manually update the Requested Approvals fields.
When you are ready to Propose the multisig click the blue button Propose and sign the transaction with your wallet.
You will receive a Success message along with a transaction hash to check the completed action and a **link to check the proposal.** You can share your MSIG with this link provided.
The link to the proposal will show the proposal in detail, with the Proposer, Proposal Name, Approval Status and the current Request Approvals by the account(s) and their individually status.
The **Approve Transaction** button is for anyone who is listed as a Requested Approval to Approve Transaction after review.
The **Execute Transaction** button is for anyone to execute once the signing threshold has been reached.
If your multisg account has a threshold of (2) then the multisig will require 2 signer accounts to Approve the transaction before you can Execute the multisig.
### 6. Approve and execute your proposal by toggling off MSIG mode from the dropdown list on the right corner and signing in or sending the proposal link to the Account holder for approval.
If you are logged into an account that is listed as one of the Request Approvals, find the proposal and click Approve Transaction.
Once the Approval Status reaches the minimum threshold, you can now execute the transaction. Press Executive Transaction.
You will receive a Success message with a transaction hash attached. You can also search up the account and verify transaction to see if the transfer has been executed.
For a more detailed guide to creating a multi-sig transaction on the XPR Network please follow [this tutorial](https://xprnetwork.org/blog/how-to-secure-your-account-with-native-2-of-3-multisig).
# Create / Register Proxy
## HOW TO CREATE A PROXY
### 1. Select **Wallet** on the top menu.

### 2. Select Manage Proxy from the left side menu.

There are 3 tabs available on the Manage Proxy page;
* Create/Delete
* Register
* Unregister
### 3. Under the Create/Delete tab, click Create Proxy.

If you are using Scatter, you will receive a prompt to whitelist the action to change your current account into a proxy.

You will receive a Success message with the transaction hash and you have turned your account into a proxy.
## HOW TO REGISTER A PROXY
### 1. Select **Wallet** on the top menu.

### 2. Select Manage Proxy from the left side menu.

There are 3 tabs available on the Manage Proxy page;
* Create/Delete
* Register
* Unregister
### 3. Under the Register tab, fill out the fields as needed. Click Register Proxy once completed.

Filling out this form will add details about your proxy to the regproxyinfo contract, but it does not create your account as a proxy. You must follow the details above on HOW TO CREATE A PROXY to create your account as a proxy.
The regproxyinfo contract will register the following information if provided;
* Display Name (max 64 chars)
* Slogan (max 64 chars)
* Philosophy (max 1024 chars)
* Background (max 1024 chars)
* Website (URL)
* Logo URL (URL to logo of proxy 256x256)
* Telegram (Telegram account name)
* Steemit (Steemit account name)
* Twitter (Twitter account name)
* Wechat (Wechat account name)
You will receive a Success message with the transaction hash and you have registered your proxy.
{% hint style="info" %}
It may take some time before your proxy shows under Registered Proxies.
{% endhint %}
# Keys Generator
This page describes how to generate a new public / private key pair for XPR Network.
## HOW TO USE KEY GENERATOR ON XPR NETWORK EXPLORER
### 1. Select **Wallet** on the top menu.
### 2. Select Utilities from the left side menu.
### 3. Under the Keys tab, the explorer provides you a key pairing with a Public Key and a Private Key.
The icon next to the keys allow you to copy the key quickly. Click Generate New Keys if you would like a different key paring.
{% hint style="warning" %}
The safest way to generate and keep your key pairing is if you generate them while offline and create a paper wallet or use some kind of encrypted password manager.
{% endhint %}
# REX
REX is a Resource Exchange on EOS, officially launched on May 1st 2019. It is a marketplace to allow risk-free leasing of network resources, CPU and NET. Our REX portal simplifies the complicated process of REX by allowing you to earn directly with your EOS. As fees from CPU/NET borrowers, namebids, etc. flow into REX, the value of your loaned EOS will go up.
REX allows dApps to rent bandwidth for a fraction of the capital cost of owning and will encourage adoption of EOS. Token holders are able to lend EOS to REX by staking their resources, and will be rewarded by the current fee. To lend EOS to REX, you must stake and you must be voting for at least 21 BPs.
{% hint style="warning" %}
It is important to note that **borrowing CPU/NET is for dApps to buy resources only**, you will **not** get the EOS spent back.
{% endhint %}

## **STEPS TO EARN WITH REX**
1. Lend as much EOS as you want.
2. Wait at least 4 days for your loan to be processed. You earn more interest the longer you wait.
3. Unlend when you are ready, you will receive original lent amount + interest.
You are guaranteed 100% of your original lent amount as lending/unlending does not change the price.
## HOW TO LEND EOS TO REX
### 1. Select **REX** on the top menu.

### 2. Select the amount of EOS you'd like to lend.

It will autofill with the 100% of EOS in your account, but you are free to enter whatever amount you’d like, or use the buttons below to easily select a percentage of your EOS owned.
*NOTE: If you are not currently voting for 21 BPs or proxying your vote, Bloks will automatically proxy your account to* [***blokspartner***](https://bloks.io/account/blokspartner) *to allow your account to be eligible to use REX. See our proxy post* [*here*](https://medium.com/@eoscafeblock/bloks-io-partners-rex-proxy-1728e86bae1e)*.*
### 3. View the amount you lent to REX, and the date you are able to unlend.

It takes approximately 4 days for loaned EOS to be processed. The example below shows that you have to wait until Sat, May 4, 2019 6:00 PM to Unlend your EOS.This page allows you to lend liquid EOS.
**Other functions we have available for REX on Bloks.io:**
* **Lend Staked EOS** — If your EOS is already staked, you can lend Staked CPU and NET to REX directly without waiting 3 days for unstaking.
* **Borrow CPU/NET** — You can borrow for yourself, or another account, the required amount of CPU or NET at the current rate listed.
* **REX Stats/Charts** — Displays # of Total Loans, Total REX, Total Lendable, Total Borrowed, Total Unborrowed, Borrowed Percent, Total Interest, REX Price and Resource Price, as well as the 7 day REX Price History.
* **Savings**— Your current account information including Liquid Balance, Processed Loans, REX History and the ability to move Liquid Loans into Savings Loans. Loans in Savings cannot be sold immediately and it **takes 4 days to move them out of savings.** This is a security feature.
* **REX History**— Shows all REX related transactions (ex. Unstaking to REX, Lending to REX, Unlending REX, etc.).
## HOW TO UNLEND EOS FROM REX
### 1. Select **REX** on the top menu.

### 2. Select the amount of EOS you'd like to unlend.

### 3. View the amount you lent to REX, and the date you are able to unlend.

When you reach the mature day of your EOS in REX, you are able to Unlend. You can select the full amount or auto-calculate by the percentage buttons.
{% hint style="info" %}
## Want to see a video demo for the steps above? Check out our [Youtube for a video tutorial on How to Lend and Unlend EOS to REX!](https://www.youtube.com/watch?v=YpBhavd4B4Q\&feature=youtu.be)
{% endhint %}
# WAX GBM Claiming
WAX Genesis Block Member (GBM) program is for anyone who have participated in the WAX Token Swap. All WAX Protocol Tokens generated during the token swap (June 30th 2019 - August 30th 2019) will be designated Genesis WAX Protocol Tokens. The WAX Token Swap is the only time that WAX Protocol Tokens will be designated Genesis WAX Protocol Tokens.
For more information on the GBM program, please visit [WAX's official blog](https://wax.io/blog/introducing-the-genesis-block-member-program-join-and-receive-daily-token-rewards-for-3-years).
For more information on Vote Claim, please visit [here](https://wax.io/blog/earn-more-wax-introducing-wax-block-rewards-staking-and-voting-guilds-and-more).
{% embed url="" %}
## HOW TO CLAIM WAX GBM USING BLOKS.IO
### 1. Visit Wax.bloks.io. Select Wallet on the top menu.

### 2. Select Claim GBM Rewards from the left side menu.

You can also visit the link below to get to the page above.
{% embed url="" %}
This function can only be carried out on wax.bloks.io and you must be logged in. Please ensure you have selected WAX as your chain to view on Bloks.io and that you are logged into your account via various wallets/methods.
### 3. Click on one of the "Claim \_\_" buttons to claim your rewards.

The Genesis and Voting Rewards tab shows;
* **Genesis Balance** - How much of GBM tokens you own
* **Last Genesis Claim** - The last time you claimed your Genesis Claim
* **Next Genesis Claim** - When you can claim your next Genesis Claim
* **Next Genesis Rewards** - The amount you can claim for your next Genesis Claim
* **Last Voter Claim** - The last time you claimed your Vote Claim
* **Next Voter Claim** - When you can claim your next Vote Claim
* **Next Voter Rewards** - The amount you can claim for your next Vote Claim
You will also have 3 buttons;
* **Claim Genesis** - Claim WAX Protocol Token GBM rewards
* **Claim Vote** - Claim WAX Staking rewards
* **Claim Both** - Claim both Genesis and Vote rewards
Click 1 of the 3 buttons to claim your rewards.
# Vote for Block Producers
This page describes how to vote for Block Producers when staking XPR.
Block Producers (BPs) are the backbone of the XPR Network. They are responsible for validating transactions and producing new blocks - similar to miners on Bitcoin or Ethereum. However, unlike proof-of-work systems, XPR Network uses **Delegated Proof of Stake (DPoS)**, meaning Block Producers must be **elected** by XPR token holders.
Only the **top 21 BPs -** ranked by total votes, actively produce blocks. It’s a standard requirement that **all BPs** operate reliable, secure infrastructure. End users should never need to worry about uptime or technical reliability. That said, voting goes far beyond just picking competent operators.
Because DPoS is a **governance model**, your vote helps shape the direction of the network. Block Producers you select **represent you** as an XPR token holder and staker. Choose BPs who not only run solid infrastructure, but also contribute meaningfully to the ecosystem through:
* Marketing and community engagement
* Business development
* Developer support and open-source contributions
* Driving adoption beyond what the core developer, [Metallicus](https://metallicus.com/), delivers
To research and compare Block Producers, use the [**LINKS**](https://explorer.xprnetwork.org/vote) column to visit their websites and social media profiles. Select up to **4 BPs** to support with your vote.
> **Note:** Voting does **not** affect your staking rewards—it’s a governance decision, not a financial one.
Before voting, make sure you’ve staked your XPR. See the [Staking + Unstaking](/wallet/staking+unstaking) section for a step-by-step guide.
## HOW TO VOTE FOR BLOCK PRODUCERS
### 1. Select **Vote** on the top menu.
Block Producers are listed in order of the current rankings.
### 2. Select the 4 Block Producers you wish to vote for by checking off the boxes next to their ranking and BP name.
### Press the blue VOTE button to proceed.
Sign the transaction using your [WebAuth.com](https://webauth.com/) Wallet or wallet of choice.
You can CTRL+F (windows) or Command+F (mac) to find the name of the BP you'd like to select to vote for. Your selections will show at the top underneath **Selected Producers**.
There are 100 Block Producers listed on each page; if you cannot find the one you are searching for, please check the other pages by scrolling to the bottom.
# Vote for Proxies
**Proxies** are created for token holders who want to participate in voicing their opinion on who should be producing blocks on the network aka be in top 21, but you may not have the time to research all the Block Producers and do your due diligence. When you proxy your vote, you allow the proxy to vote on your behalf.
**Registered proxies** are proxies who chose to be more transparent by [providing information](https://github.com/alohaeos/eos-proxyinfo) about themselves including name, slogan, philosophy, background, website, and more. **Unregistered proxies** do not provide this information.
## HOW TO VOTE FOR A PROXY
### 1. Select **Vote** on the top menu.

### 2. Select Proxies.

You will be able to view all Registered Proxies at first glance. If you'd like to see both registered and unregistered proxies, select the option "All" next to Filter Proxies.
### 3. Select the proxy you would like to proxy your votes to. Press the blue SET \_\_\_\_\_ AS PROXY button to proceed.

### 4. If it is the first time you are proxying your votes, you may get a prompt from Scatter to whitelist your action. Click Allow.

Your transaction will be approved once you whitelist the above action.
# XPR Network Logos
XPR Network Glyph
XPR Network Primary Logo
# XPR Network Glossary
A quick reference for core terms, protocols, and tools within the XPR Network ecosystem.
#### **XPR Network**
A high-performance Layer 1 blockchain built on WASM and DPoS (Delegated Proof of Stake). Designed for real-world utility, instant finality, zero gas fees, and seamless user onboarding.
***
#### **XPR (Token)**
The native utility token of the XPR Network, used for staking, governance voting, and powering dApps.
[Learn how to buy XPR](https://help.xprnetwork.org/hc/en-us/articles/4417459294615-Where-Can-I-Buy-XPR-Network-XPR) | [Staking guide](/wallet/staking+unstaking)
***
#### **Staking**
Locking up XPR to participate in governance. Required to vote for Block Producers. Staking also increases account security via a 24-hour unstaking delay.
[Staking & Unstaking Guide](/wallet/staking+unstaking)
***
#### **Unstaking**
The process of unlocking your XPR. Takes 24 hours to complete. During this period, you can still cancel the request.
***
#### **Block Producers (BPs)**
Elected entities that produce blocks and maintain the network. Only the top 21 by vote rank are active at any given time.
[BP Voting Guide](/voting/vote-for-block-producers)
***
#### **Voting**
Stakers can vote for up to 4 Block Producers. Voting doesn’t impact staking rewards but influences network direction via DPoS governance.
[How to Vote](/voting/vote-for-block-producers)
***
#### **DPoS (Delegated Proof of Stake)**
The consensus mechanism used by XPR Network. Token holders delegate votes to Block Producers, who validate transactions and propose blocks.
***
#### **WebAuth Wallet**
The official non-custodial wallet for the XPR Network. Available on web and mobile (iOS/Android). Supports account creation, staking, NFTs, and fiat on-ramp.
[WebAuth.com](https://webauth.com/) | [iOS](https://apps.apple.com/us/app/webauth/id1594500069) | [Android](https://play.google.com/store/apps/details?id=com.metallicus.webauth)
***
#### **explorer.xprnetwork.org**
The official XPR Network blockchain explorer, formerly known as bloks.io. Use it to search accounts, tokens, transactions, and Block Producers.
[Visit Explorer](https://explorer.xprnetwork.org/)
***
#### **Metallicus**
The core contributor and primary developer of the XPR Network, also responsible for the WebAuth Wallet, Metal X, and other ecosystem tools.
[Metallicus.com](https://metallicus.com/)
***
#### **Metal X**
A fully on-chain, gas-free decentralized exchange (DEX) powered by the XPR Network. Offers CLOB-style trading and xtokens.
[Metal X DEX](https://metalx.com/) | [Referral Program](https://metalx.com/learn/referral-program)
***
#### **xtokens**
Trusted, 1:1-backed representations of top digital assets (like BTC, ETH, XRP, DOGE) bridged onto XPR Network. Easily recognizable, gas-free, and tradable on Metal X.
[What are xtokens?](https://metalx.com/learn/bridge)
***
#### **Governance Dashboard**
A portal where users can participate in proposals and vote on decisions affecting the XPR Network.
[Visit gov.xprnetwork.org](https://gov.xprnetwork.org/)
***
#### **Resources**
Used to perform transactions on XPR Network instead of gas. Every account receives RCs based on its XPR balance and staking amount.\
[RCs Explained](https://chatgpt.com/g/g-p-67aa2510625481919c1c99df8ce6b0f6-xpr-network/c/686560de-5754-8010-a230-37e8a0d9a600#)
***
#### **Account Permissions**
Each account has different permission levels (owner, active). You can customize control and recovery options.
[Account Security & Permissions](/wallet/permissions)
***
#### **Fiat On-Ramp**
Integrated into WebAuth Wallet, allowing users to buy XPR with debit/credit cards in supported regions like the U.S., Australia, and New Zealand.